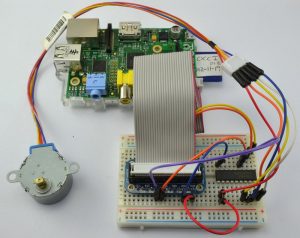
Motors make the world spin around, and now you can easily control motors with digital stepper motor driver and the dc Motor & Stepper driver! Simple dc motors can moved forwards and backwards, perfect for moving the wheels on a robot or vehicle. Stepper motors can precisely move in small increments, like moving the nozzle of a 3D printer up and down with millimeter accuracy. Since the motor only uses the I2C (SDA & SCL pins), it works with any and all Feathers. For this reason, stepper motors are the motor of choice for many precision motion control applications. Stepper motors come in many different sizes and styles and electrical characteristics. This guide details what you need to know to pick the right motor for the job. In this lesson you will learn how to control a stepper motor using your pi and the same motor control chip that you used with the dc motor in this part.
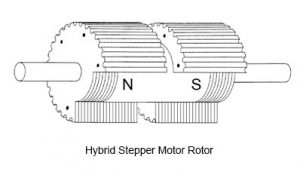
The part will also show you how to use an alternative driver chip, the ULN2803.For this project, it does not really matter if you use a L293D or a ULN2803. The lower cost of the ULN2803 and the four spare outputs, that you could use for something else, probably make it the best choice if you don’t have either chip. The motor is quite low power and suffers less from the surges in current than dc motors and servos (which use DC motors). The original hybrid stepper motor is one of our most beloved shields, which is why we decided to squish it all together on a motor to make something even smaller, lighter, and more portable! Instead of using a latch and the Arduino’s PWM pins, we have a fully-dedicated PWM driver chip onboard. This chip handles all the motor and speed controls over I2C.
This project will therefore work okay powered from the 5V line of the Raspberry Pi, as long as the Pi is powered from a good supply of at least 1A. Comes with an assembled & tested Feather Wing, terminal blocks & plain header. Some soldering is required to assemble the headers on. Stacking headers not included, but we sell them in the shop so if you want to stack shields, please pick them up at the same time. Feather and motors are not included but we have lots of motors in the shop. You can use any DC or stepper motors that run from 4.5-13.5VDC and draw under 1.2A per coil. You’ll likely also need to provide some external power supply for your motors, since its not suggested you run motors from the Feather’s lipoly battery. For a healthy culture and delicious tasting ‘buch you’ll need to maintain a pretty high temperature (~77F/25C) while brewing (5-7 days). Keeping the brew that warm is challenging in colder climates. With a little help from a terrarium heater and some electronics, I created a thermostat for brewing year round.